Video – How To Create Dramatic Skies in Lightroom in 3 Clicks
Have you ever taken a picture of an amazing scene only to realize afterwards that the sky is dull?
Well, read through to know how to easily create dramatic skies in Lightroom, and much more about the Graduated Filter!
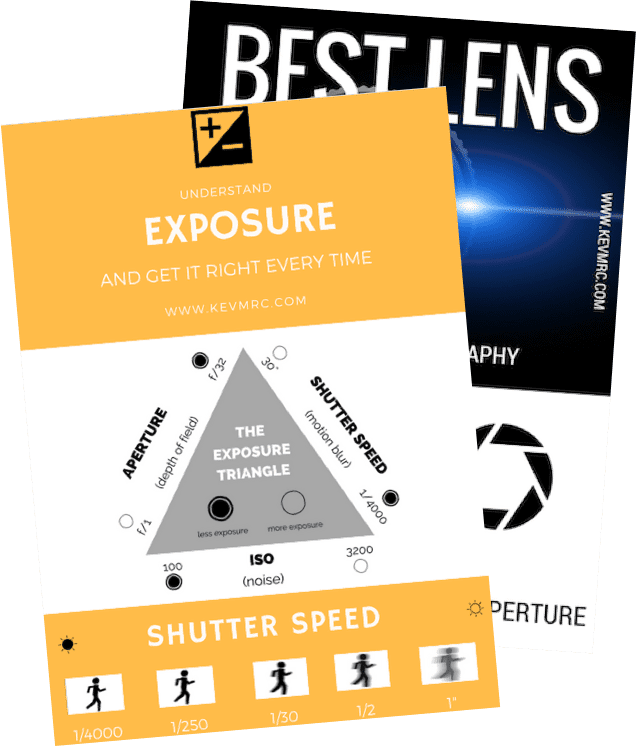
There are mainly 2 ways to expose a photo: expose for the highlights, or expose for the shadows (learn more about it here: Exposure 101 – Understand Exposure and Get It Right Everytime)
If you expose for the shadows, often meaning you try to correctly expose your foreground, the sky will be blown out and you’ll lose details. This will result in a dull sky, that can quickly ruin your photo. You could fix it by using bracketing, or by using a simple Lightroom tool: the Graduated Filter.
Enter your email below to get access to FREE resources to help you improve your photography
Get my FREE Photo Resources
Need help perfecting your photos? I've created step-by-step guides and compiled all my tips in a folder that I'm giving you free access to, to help you become a better photographer. Get it straight to your inbox now!
No spam, unsubscribe anytime.The easy 3 clicks solution to create dramatic skies
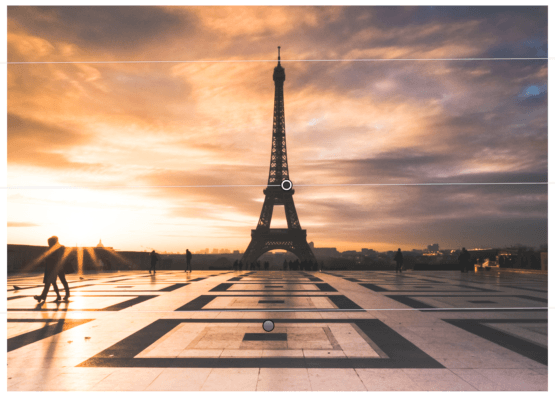
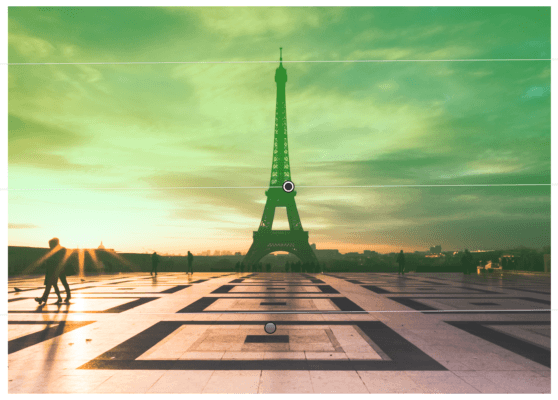
1 – Click on “Graduated Filter”
2 – Click and drag to cover the sky
3 – Click on minus exposure
The amount of exposure you’ll want to decrease varies from picture to picture, but you’ll generally get great results between -0.5 and -1.5
Using this simple 3 clicks technique, you can make that much of a difference in your photos
Tap on the photo to see the before/after
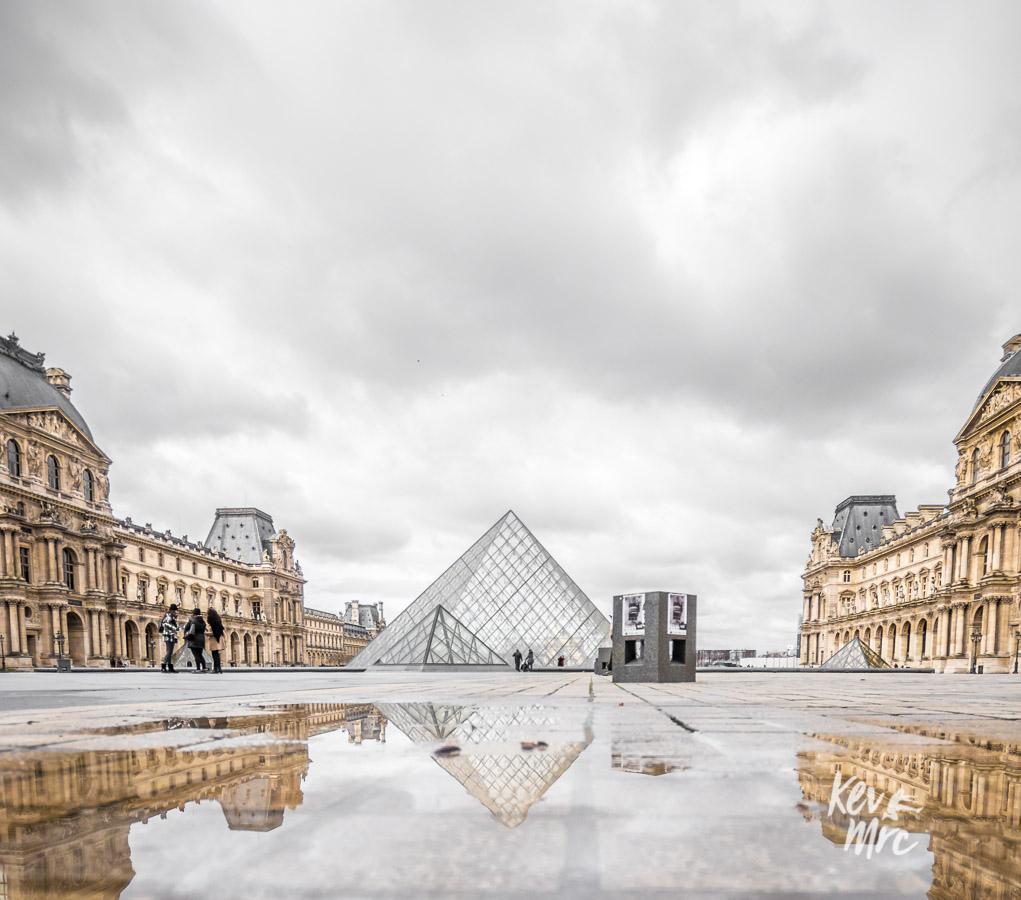
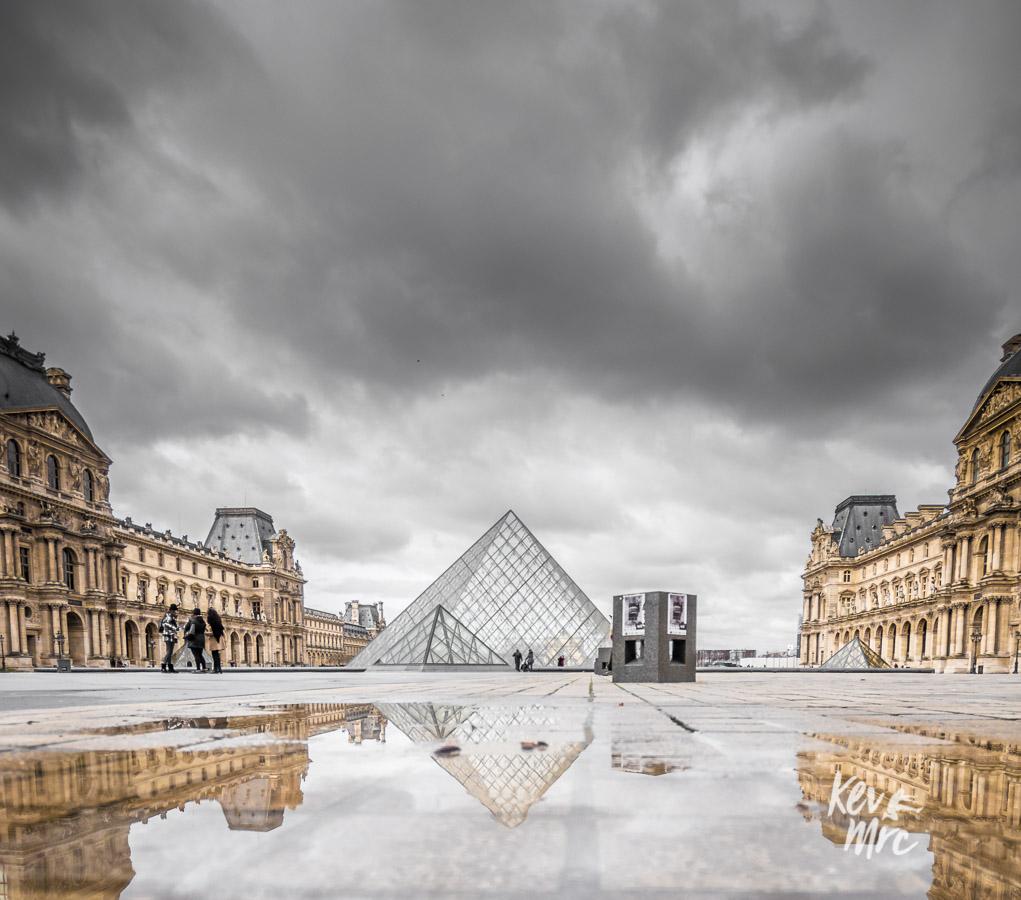
Keep in mind that it’s usually best to first edit your picture, and then apply the graduated filter to the sky.
In Depth Guide and Tips for Graduated Filters in Lightroom
If you were already familiar with the previously explained technique, and/or if you want to take your editing further, here are some more tips and advices about how to use the graduated filter to create dramatic skies.
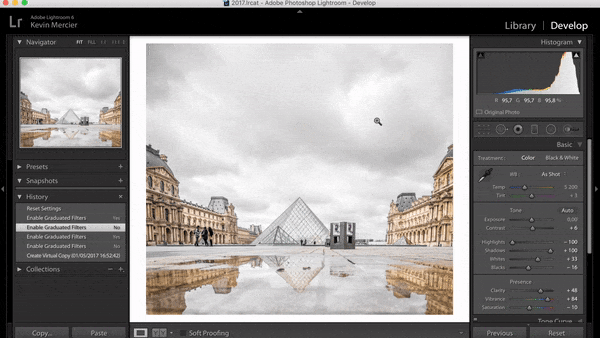
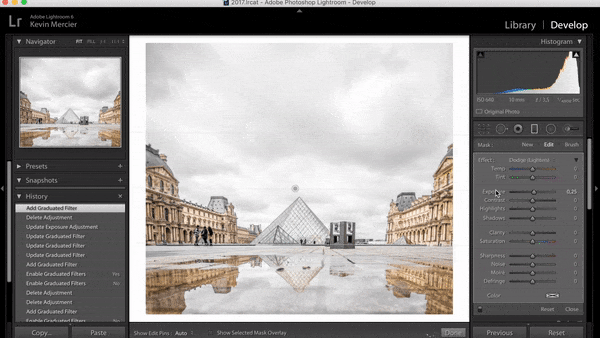
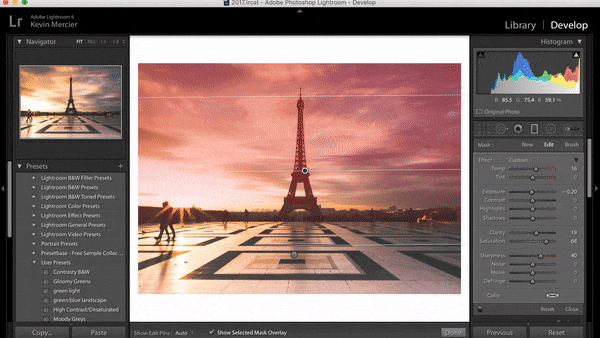
When you open Lightroom, select the picture you want to edit and press “D” to open the Develop Module. Once in there, press “M” to open the Graduated Filter panel.
Select The Area
The first thing you need to do is selecting the area you want to apply the graduated filter to.
Click in the sky where you want the full effect to be applied, and then drag it down to fade it to the point where you want the effect to stop.
The more you drag the filter, the more subtle the changes will be, with the effect progressively fading over the sky
Pro tip: hold down the “Shift” key while dragging down to keep the graduated filter horizontal
Once you’re done, you can press “o” to see where the effect is applied.
Everything in red (or green, black, white depending on your settings) is where the graduated filter is applied.
If you’re not happy with it, you can modify the filter:
- Click & drag on the black dot to move the filter up & down
- move your mouse on the middle line until an arrow appears; click & drag on the arrow to change the orientation
- click & drag the lowest line to change the fade amount; the further away from the middle line, the more fade.
Pro tip: hold down the alt key while you’re dragging down to drag down without affecting the position of the middle line
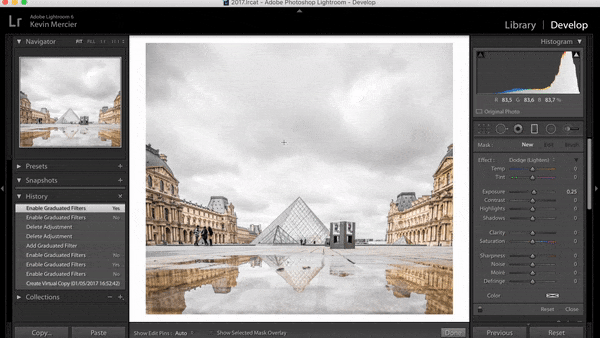
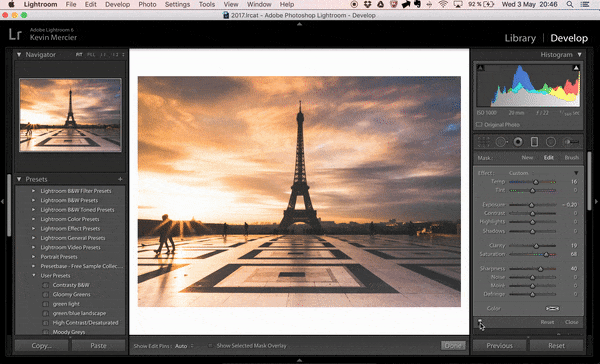
Change the Settings to Create Dramatic Skies
Once you’ve selected the area where you want the graduated filter to be applied, you can begin changing the settings by moving the different sliders to create dramatic skies.
I know, I know, there are a lot of sliders. Temperature, tint, exposure, contrast, highlights, shadows, clarity, saturation, sharpness, noise, moiré, defringe and color. Where to start?
Let’s go over some of the sliders and explain how to use them to get the dramatic sky you’re after.
Exposure
Exposure is the most straightforward slider to use to create dramatic skies. If your sky is overexposed (too bright), drag the slider to the left to make the sky darker and bring out the details. If your sky is underexposed (too dark), drag the slider to the right to make the sky lighter.
Contrast
If there are clouds in your sky, you could add some contrast to really make them pop and amplify the difference between the sky and the clouds; this will create a dramatic sky. If you feel your picture has already enough points of interest, you could decrease the contrast to soften the sky.
Highlights and Shadows
Highlights and shadows have the same effect as exposure; they’ll brighten or darken the sky. However, the highlights will only affect the bright part of what’s in the graduated filter, and the shadows will only affect the dark part.
This is really useful to selectively adjust your sky: there’s usually something in the picture breaking the horizon line, such as trees, buildings, people, … By tweaking only the highlights, you can use the graduated filter to darken the sky, but only the sky and not the other things that are in the area affected by the graduated filter. In the same way, you can darken the sky by decreasing the exposure, and then opening up the shadows to bring back details on the other objects.
Clarity
Adding some clarity to the graduated filter will help create a more dramatic sky by making the clouds pop more (the added clarity will amplify the areas where the clouds touch the sky).
Saturation
The saturation slider will help you choose from a moody sky and a colorful one. By decreasing the saturation, you’ll get less colors in the sky, creating a moody feel. By increasing it, you’ll bring out the colors in the sky.
Changing the colors
To change the colors of the sky, you have 2 choices: use the temperature & tint sliders, or use the “color” option at the bottom.
Temperature & Tint
Similar to how you’re setting your white balance, you can adjust the temperature and tint sliders in the graduated filter to change the color of the sky. Use the temperature one to get a cooler (bluer) or warmer (yellower) sky. Use the tint slider to decrease the reds or increase them if you’re working on a sunset/sunrise sky.
Color
By clicking on the white square next to “Color”, you’ll be able to chose exactly the color you want to apply to the graduated filter, by choosing the shade and the amount of saturation.
So there you have it, the main ways to create dramatic skies; don’t be afraid to experiment with the sliders, and see what works. Combining different effects by moving different sliders is also a good way to achieve great results.
Some more tips
Just when you thought you already had too much information to process… here are some more tips!
See where the effect is applied and change the overlay color
To see exactly where the graduated filter effect is applied, select your graduated filter by clicking on the dot, then press “o”. It will color the area where the effect is applied. The more intense the color, the stronger the effect.
You might notice that my overlay is green, while yours is probably red. In Lightroom, you have 4 different options to display the overlay: red, green, white or black. I just changed mine to green because I was having trouble seeing the red overlay in sunset skies.
To change it, simply go to the Develop Module (D) and open the Graduated Filter (M). Then go to “Tools“, “Adjustment Mask Overlay”, and choose the color you want.
Pro Tip: If you press Shift + “o”, you’ll cycle through the 4 different overlay colors; easy way to change the color without having to go through the menus.
See before/after
To see what you’re doing and how your graduated filter is changing your sky, you can press on the light switch at the bottom of the graduated filter panel, to toggle the effect on and off.
However if you’re using multiple graduated filters, it will toggle on/off all of them. To see the before/after of the exact graduated filter you’re working on, double click on “Effect” to reset the settings (that will show you the before) and then press “Command+Z” on Mac or “Control+Z” on PC to undo the reset (that will show you the after).
Apply Multiple Filters
You can apply multiple graduated filters to your skies: right click duplicate on the black dot in the middle of your filter to duplicate it and strengthen the effect, or add other graduated filters to close down the image by brightening/darkening the edge of the sky.
Erase the Effect From Chosen Areas
When you use the graduated filter, it applies to the whole zone you’ve chosen. But sometimes, there are some elements in the zone that you don’t want the filter to affect, such as people, buildings, …
To remove the effect from these zones, it’s easy. Watch the video above to see how to do it:
- Click on “Brush”
- Click on “Erase” at the bottom of the graduated filter panel
- Brush the areas where you want to erase the effect
Additional Uses for the Graduated Filter
Now that we’ve seen what is a Graduated Filter, how to use it, and how to create dramatic skies with this simple tool, we’ll see other ways you can use the Graduated Filter in Lightroom, such as drawing more attention to a specific area, closing your image, blurring the background, creating light, using clarity locally, …
Draw More Attention to a Specific Area
You can easily draw more attention to a specific area with the graduated filter, and you can do so in 2 ways:
- apply the filter to the area you want to highlight, and add some exposure
- apply the filter to the area that steals too much attention, and lower the exposure
Close your Image
You can use the Vignette effect in Lightroom to close down your images; however doing so with the graduated filters gives you more control. Apply filters to the edge of the image where you want to close it down, and add/lower the exposure. You can use multiple filters in different locations to really close the image.
The added value given by the graduated filter is that you can choose to close the image only at the top, only at the bottom, or only on the side; whereas if you use the Vignette, it will apply the effect on every side.
Blurring the Background
If you want to draw more attention to a specific area of the picture (a face, an object), you can blur everything else, so that the only thing in focus/sharp will be the area you want to draw attention to.
Apply several filters to cover all the areas you want to blur, and then lower the sharpness, from -50 to -100 sharpness.
Create Light
By using the color setting or changing the temperature/tint sliders, you can add a color to your picture.
Punch up the temperature slider to the yellows/add an orange color; add only to one side and create the effect that light is bouncing on your subject.
Add Clarity Locally
Clarity is tricky to use: it can very quickly make your photos look fake, and overdone. My advice is that for most pictures, you shouldn’t add too much overall clarity to your images in Lightroom basic panel. Instead, add clarity only to area you want to draw focus to, by using the graduated filter.
Get it right in camera
Post processing and taking a photo go hand-in-hand. They’re both equally important, and you shouldn’t neglect any of them.
The Graduated Filter is a wonderful tool to use in Lightroom; however, you should always strive to get the scene right in your camera. That will simplify the editing process, and make for a much more natural image. Check out “Exposure 101 – Understand Exposure and Get It Right Every Time” to help you with it, and “7 Reasons to Stop Using Auto Mode”
If you weren’t able to get what you wanted straight out of the camera, or if you want to add additional effects, then the Graduated Filter is one of the tool you can use.
I hope this guide helped you learn more about the Graduated filter, and that you’re now able to confidently use it to get exactly what you want out of your raw files in Lightroom.
Leave me a comment below if this guide helped you, or if you want to share any other techniques for using the Graduated Filters in Lightroom!

Pin this to Pinterest!
Enjoyed this guide? Then help a fellow traveler and pin it! They'll most definitely love you for it, 100% guarantee.